19 KiB
19 KiB
Filebeat

一:基本概念
1. Filebeat 简介
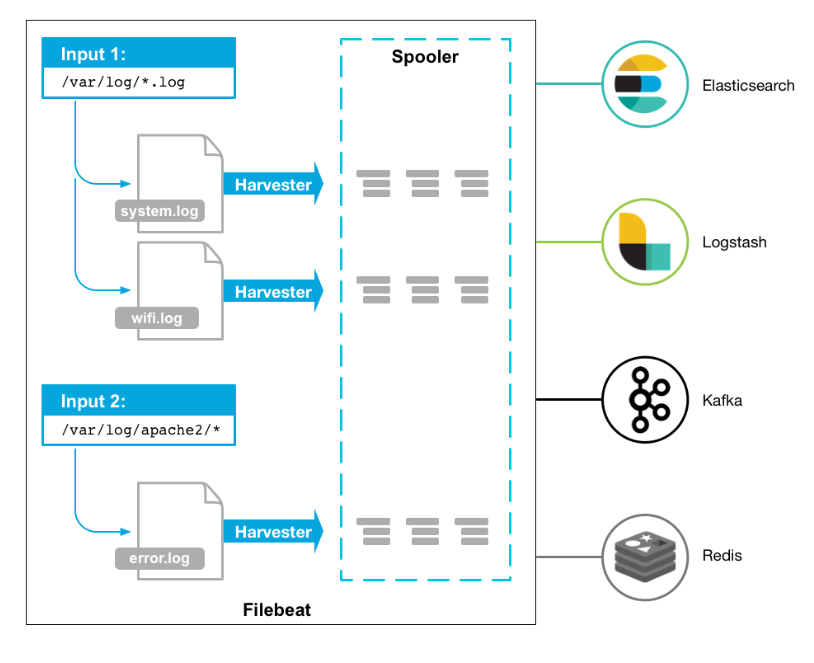
Filebeat是本地文件的日志数据采集器。 作为服务器上的代理安装,Filebeat监视日志目录或特定日志文件,并将它们转发给Elasticsearch、Logstash、kafka 等。
2. 核心组件
- prospector:负责读取单个文件的内容。读取每个文件,并将内容发送到 the output每个文件启动一harvester, harvester 负责打开和关闭文件,这意味着在运行时文件描述符保持打开状态,如果文件在读取时被删除,Filebeat将继续读取文件
- harvester:负责管理harvester并找到所有要读取的文件来源。如果输入类型为日志,则查找器将查找路径匹配的所有文件,并为每个文件启动一个harvester。每个prospector都在自己的Go协程中运行
3. 工作原理
启动Filebeat时,它会启动一个或多个查找器,查看您为日志文件指定的本地路径。 对于prospector 所在的每个日志文件,prospector 启动harvester,每个harvester都会为新内容读取单个日志文件,并将新日志数据发送到libbeat,后者将聚合事件并将聚合数据发送到您为Filebeat配置的输出
注意:
Filebeat目前支持两种prospector类型:log和stdin
4. 为什么使用filebeat
Filebeat是一种轻量级的日志搜集器,其不占用系统资源,自出现之后,迅速更新了原有的elk架构。它将收集到的数据发送给Logstash解析过滤,在Filebeats与Logstash传输数据的过程中,为了安全性,可以通过ssl认证来加强安全性。之后将其发送到Elasticsearch存储,并由kibana可视化分析。
二:安装部署
1. 安装方式
- rpm包的方式安装:filebeat-8.13.4-x86_64.rpm
- 压缩包解压安装:filebeat-8.13.4-linux-x86_64.tar.gz
2. 获取安装包
官网地址:
- https://artifacts.elastic.co/downloads/beats/filebeat/filebeat-8.13.4-x86_64.rpm
- https://artifacts.elastic.co/downloads/beats/filebeat/filebeat-8.13.4-linux-x86_64.tar.gz
[root@filebeat ~]# wget https://artifacts.elastic.co/downloads/beats/filebeat/filebeat-8.13.4-x86_64.rpm
3. 二进制安装
[root@filebeat ~]# yum -y install ./filebeat-8.13.4-x86_64.rpm
4. 修改配置
[root@filebeat ~]# vim /etc/filebeat/filebeat.yml
setup.kibana:
  host: "192.168.159.134:5601"
output.elasticsearch:
  hosts: ["192.168.159.131:9200"]
  protocol: "https"
  username: "elastic"
  password: "123456"
  ssl.ca_trusted_fingerprint: "966AE2F15E6BDCD6FED1904B99A652831424FC80086F76ADAC827987CFC5944F"
注意:
- 在生产环境中,请勿使用内置 elastic 用户来保护客户端
- 而要设置授权用户或 API 密钥,并且不要在配置文件中暴露密码
- 如何获取
ssl.ca_trusted_fingerprint参数的值 - 在ES节点上利用ES的CA文件获取
[root@elasticsearch1 ~]# openssl x509 -fingerprint -sha256 -noout -in /usr/local/elasticsearch/config/certs/elasticsearch-ca.pem | awk --field-separator="=" '{print $2}' | sed 's/://g'
966AE2F15E6BDCD6FED1904B99A652831424FC80086F76ADAC827987CFC5944F
扩展:
- 该实验不用
- 输出到kafka配置
output.kafka:
  enabled: true
  hosts: ["172.17.0.4:9092","172.17.0.5:9092"]
  topic: 'kafka_run_log'
5. 启用Nginx模块
[root@filebeat ~]# filebeat modules enable nginx
Enabled nginx
修改:参考官方文档
https://www.elastic.co/guide/en/beats/filebeat/8.13/filebeat-module-nginx.html
[root@filebeat ~]# vim /etc/filebeat/modules.d/nginx.yml
- module: nginx
  # Access logs
  access:
    enabled: true

    # Set custom paths for the log files. If left empty,
    # Filebeat will choose the paths depending on your OS.
    var.paths: ["/var/log/nginx/access.log*"]

  # Error logs
  error:
    enabled: true

    # Set custom paths for the log files. If left empty,
    # Filebeat will choose the paths depending on your OS.
    var.paths: ["/var/log/nginx/error.log*"]
启动服务:
[root@filebeat ~]# filebeat setup
[root@filebeat ~]# systemctl start filebeat
6. 模拟产生数据
访问Nginx产生数据
7. 查看图标
获取状态码访问情况

获取错误日志情况

获取访问路径请求
获取访问数据量情况

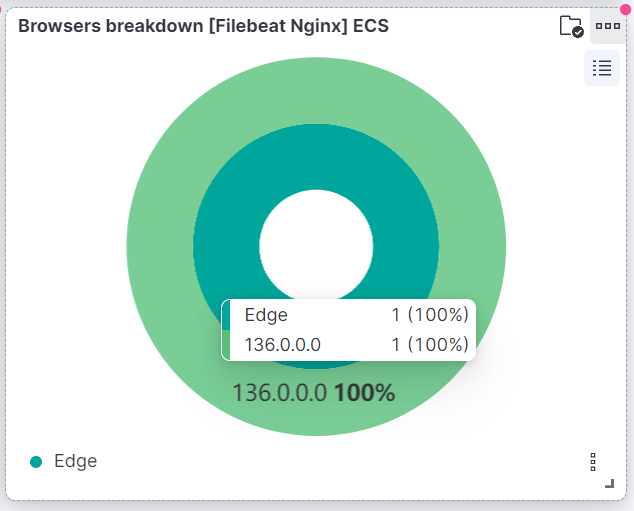
获取客户端使用情况
获取服务器访问量

三:配置文件详解
1. 配置文件
############### Filebeat 配置文件说明#############
filebeat:
  # List of prospectors to fetch data.
  prospectors:
    -
      # paths指定要监控的日志
      paths:
        - /var/log/*.log

      #指定被监控的文件的编码类型使用plain和utf-8都是可以处理中文日志的。
      # Some sample encodings:
      #   plain, utf-8, utf-16be-bom, utf-16be, utf-16le, big5, gb18030, gbk,
      #    hz-gb-2312, euc-kr, euc-jp, iso-2022-jp, shift-jis, ...
      #encoding: plain

      #指定文件的输入类型log(默认)或者stdin。
      input_type: log

      # 在输入中排除符合正则表达式列表的那些行
      # exclude_lines: ["^DBG"]

      # 包含输入中符合正则表达式列表的那些行默认包含所有行include_lines执行完毕之后会执行exclude_lines。
      # include_lines: ["^ERR", "^WARN"]

      # 忽略掉符合正则表达式列表的文件默认为每一个符合paths定义的文件都创建一个harvester。
      # exclude_files: [".gz$"]

      # 向输出的每一条日志添加额外的信息比如“level:debug”方便后续对日志进行分组统计。默认情况下会在输出信息的fields子目录下以指定的新增fields建立子目录例如fields.level。
      #fields:
      #  level: debug
      #  review: 1

      # 如果该选项设置为true则新增fields成为顶级目录而不是将其放在fields目录下。自定义的field会覆盖filebeat默认的field。
      #fields_under_root: false

      # 可以指定Filebeat忽略指定时间段以外修改的日志内容比如2h两个小时或者5m(5分钟)。
      #ignore_older: 0

      # 如果一个文件在某个时间段内没有发生过更新则关闭监控的文件handle。默认1h,change只会在下一次scan才会被发现
      #close_older: 1h

      # 设定Elasticsearch输出时的document的type字段也可以用来给日志进行分类。Default: log
      #document_type: log

      # Filebeat以多快的频率去prospector指定的目录下面检测文件更新比如是否有新增文件如果设置为0s则Filebeat会尽可能快地感知更新占用的CPU会变高。默认是10s。
      #scan_frequency: 10s

      # 每个harvester监控文件时使用的buffer的大小。
      #harvester_buffer_size: 16384

      # 日志文件中增加一行算一个日志事件max_bytes限制在一次日志事件中最多上传的字节数多出的字节会被丢弃。The default is 10MB.
      #max_bytes: 10485760

      # 适用于日志中每一条日志占据多行的情况比如各种语言的报错信息调用栈。这个配置的下面包含如下配置
      #multiline:

        # The regexp Pattern that has to be matched. The example pattern matches all lines starting with [
        #pattern: ^\[

        # Defines if the pattern set under pattern should be negated or not. Default is false.
        #negate: false

        # Match can be set to "after" or "before". It is used to define if lines should be append to a pattern
        # that was (not) matched before or after or as long as a pattern is not matched based on negate.
        # Note: After is the equivalent to previous and before is the equivalent to to next in Logstash
        #match: after

        # The maximum number of lines that are combined to one event.
        # In case there are more the max_lines the additional lines are discarded.
        # Default is 500
        #max_lines: 500

        # After the defined timeout, an multiline event is sent even if no new pattern was found to start a new event
        # Default is 5s.
        #timeout: 5s

      # 如果设置为trueFilebeat从文件尾开始监控文件新增内容把新增的每一行文件作为一个事件依次发送而不是从文件开始处重新发送所有内容。
      #tail_files: false

      # Filebeat检测到某个文件到了EOF之后每次等待多久再去检测文件是否有更新默认为1s。
      #backoff: 1s

      # Filebeat检测到某个文件到了EOF之后等待检测文件更新的最大时间默认是10秒。
      #max_backoff: 10s

      # 定义到达max_backoff的速度默认因子是2到达max_backoff后变成每次等待max_backoff那么长的时间才backoff一次直到文件有更新才会重置为backoff。
      #backoff_factor: 2

      # 这个选项关闭一个文件,当文件名称的变化。#该配置选项建议只在windows。
      #force_close_files: false

    # Additional prospector
    #-
      # Configuration to use stdin input
      #input_type: stdin

  # spooler的大小spooler中的事件数量超过这个阈值的时候会清空发送出去不论是否到达超时时间。
  #spool_size: 2048

  # 是否采用异步发送模式(实验!)
  #publish_async: false

  # spooler的超时时间如果到了超时时间spooler也会清空发送出去不论是否到达容量的阈值。
  #idle_timeout: 5s

  # 记录filebeat处理日志文件的位置的文件
  registry_file: /var/lib/filebeat/registry

  # 如果要在本配置文件中引入其他位置的配置文件可以写在这里需要写完整路径但是只处理prospector的部分。
  #config_dir:


############################# Output ############

# 输出到数据配置.单个实例数据可以输出到elasticsearch或者logstash选择其中一种注释掉另外一组输出配置。
output:

  ### 输出数据到Elasticsearch
  elasticsearch:
    # IPv6 addresses should always be defined as: https://[2001:db8::1]:9200
    hosts: ["localhost:9200"]

    # 输出认证.
    #protocol: "https"
    #username: "admin"
    #password: "s3cr3t"

    # 启动进程数.
    #worker: 1

    # 输出数据到指定index default is "filebeat"  可以使用变量[filebeat-]YYYY.MM.DD keys.
    #index: "filebeat"

    # 一个模板用于设置在Elasticsearch映射默认模板加载是禁用的,没有加载模板这些设置可以调整或者覆盖现有的加载自己的模板
    #template:

      # Template name. default is filebeat.
      #name: "filebeat"

      # Path to template file
      #path: "filebeat.template.json"

      # Overwrite existing template
      #overwrite: false

    # Optional HTTP Path
    #path: "/elasticsearch"

    # Proxy server url
    #proxy_url: http://proxy:3128

    # 发送重试的次数取决于max_retries的设置默认为3
    #max_retries: 3

    # 单个elasticsearch批量API索引请求的最大事件数。默认是50。
    #bulk_max_size: 50

    # elasticsearch请求超时事件。默认90秒.
    #timeout: 90

    # 新事件两个批量API索引请求之间需要等待的秒数。如果bulk_max_size在该值之前到达额外的批量索引请求生效。
    #flush_interval: 1

    # elasticsearch是否保持拓扑。默认false。该值只支持Packetbeat。
    #save_topology: false

    # elasticsearch保存拓扑信息的有效时间。默认15秒。
    #topology_expire: 15

    # 配置TLS参数选项如证书颁发机构等用于基于https的连接。如果tls丢失主机的CAs用于https连接elasticsearch。
    #tls:
      # List of root certificates for HTTPS server verifications
      #certificate_authorities: ["/etc/pki/root/ca.pem"]

      # Certificate for TLS client authentication
      #certificate: "/etc/pki/client/cert.pem"

      # Client Certificate Key
      #certificate_key: "/etc/pki/client/cert.key"

      # Controls whether the client verifies server certificates and host name.
      # If insecure is set to true, all server host names and certificates will be
      # accepted. In this mode TLS based connections are susceptible to
      # man-in-the-middle attacks. Use only for testing.
      #insecure: true

      # Configure cipher suites to be used for TLS connections
      #cipher_suites: []

      # Configure curve types for ECDHE based cipher suites
      #curve_types: []

      # Configure minimum TLS version allowed for connection to logstash
      #min_version: 1.0

      # Configure maximum TLS version allowed for connection to logstash
      #max_version: 1.2


  ### 发送数据到logstash 单个实例数据可以输出到elasticsearch或者logstash选择其中一种注释掉另外一组输出配置。
  #logstash:
    # Logstash 主机地址
    #hosts: ["localhost:5044"]

    # 配置每个主机发布事件的worker数量。在负载均衡模式下最好启用。
    #worker: 1

    # #发送数据压缩级别
    #compression_level: 3

    # 如果设置为TRUE和配置了多台logstash主机输出插件将负载均衡的发布事件到所有logstash主机。
    #如果设置为false输出插件发送所有事件到随机的一台主机上如果选择的不可达将切换到另一台主机。默认是false。
    #loadbalance: true

    # 输出数据到指定index default is "filebeat"  可以使用变量[filebeat-]YYYY.MM.DD keys.
    #index: filebeat

    # Optional TLS. By default is off.
    #配置TLS参数选项如证书颁发机构等用于基于https的连接。如果tls丢失主机的CAs用于https连接elasticsearch。
    #tls:
      # List of root certificates for HTTPS server verifications
      #certificate_authorities: ["/etc/pki/root/ca.pem"]

      # Certificate for TLS client authentication
      #certificate: "/etc/pki/client/cert.pem"

      # Client Certificate Key
      #certificate_key: "/etc/pki/client/cert.key"

      # Controls whether the client verifies server certificates and host name.
      # If insecure is set to true, all server host names and certificates will be
      # accepted. In this mode TLS based connections are susceptible to
      # man-in-the-middle attacks. Use only for testing.
      #insecure: true

      # Configure cipher suites to be used for TLS connections
      #cipher_suites: []

      # Configure curve types for ECDHE based cipher suites
      #curve_types: []


  ### 文件输出将事务转存到一个文件每个事务是一个JSON格式。主要用于测试。也可以用作logstash输入。
  #file:
    # 指定文件保存的路径。
    #path: "/tmp/filebeat"

    # 文件名。默认是 Beat 名称。上面配置将生成 packetbeat, packetbeat.1, packetbeat.2 等文件。
    #filename: filebeat

    # 定义每个文件最大大小。当大小到达该值文件将轮滚。默认值是1000 KB
    #rotate_every_kb: 10000

    # 保留文件最大数量。文件数量到达该值将删除最旧的文件。默认是7一星期。
    #number_of_files: 7


  ### Console output 标准输出JSON 格式。
  # console:
    #如果设置为TRUE事件将很友好的格式化标准输出。默认false。
    #pretty: false


############################# Shipper #############

shipper:
  # #日志发送者信息标示
  # 如果没设置以hostname名自居。该名字包含在每个发布事务的shipper字段。可以以该名字对单个beat发送的所有事务分组。
  #name:

  # beat标签列表包含在每个发布事务的tags字段。标签可用很容易的按照不同的逻辑分组服务器。
  #例如一个web集群服务器可以对beat添加上webservers标签然后在kibana的visualisation界面以该标签过滤和查询整组服务器。
  #tags: ["service-X", "web-tier"]

  # 如果启用了ignore_outgoing选项beat将忽略从运行beat服务器上所有事务。
  #ignore_outgoing: true

  # 拓扑图刷新的间隔。也就是设置每个beat向拓扑图发布其IP地址的频率。默认是10秒。
  #refresh_topology_freq: 10

  # 拓扑的过期时间。在beat停止发布其IP地址时非常有用。当过期后IP地址将自动的从拓扑图中删除。默认是15秒。
  #topology_expire: 15

  # Internal queue size for single events in processing pipeline
  #queue_size: 1000

  # GeoIP数据库的搜索路径。beat找到GeoIP数据库后加载然后对每个事务输出client的GeoIP位置目前只有Packetbeat使用该选项。
  #geoip:
    #paths:
    #  - "/usr/share/GeoIP/GeoLiteCity.dat"
    #  - "/usr/local/var/GeoIP/GeoLiteCity.dat"


############################# Logging #############


# 配置beats日志。日志可以写入到syslog也可以是轮滚日志文件。默认是syslog。
logging:

  # 如果启用发送所有日志到系统日志。
  #to_syslog: true

  # 日志发送到轮滚文件。
  #to_files: false

  #
  files:
    # 日志文件目录。
    #path: /var/log/mybeat

    # 日志文件名称
    #name: mybeat

    # 日志文件的最大大小。默认 10485760 (10 MB)。
    rotateeverybytes: 10485760 # = 10MB

    # 保留日志周期。 默认 7。值范围为2 到 1024。
    #keepfiles: 7

  # Enable debug output for selected components. To enable all selectors use ["*"]
  # Other available selectors are beat, publish, service
  # Multiple selectors can be chained.
  #selectors: [ ]

  # 日志级别。debug, info, warning, error 或 critical。如果使用debug但没有配置selectors* selectors将被使用。默认error。
2. 参数详解
解压方式安装使用
-c, --c FILE
        指定用于Filebeat的配置文件。 你在这里指定的文件是相对于path.config。 如果未指定-c标志,则使用默认配置文件filebeat.yml。
-d, --d SELECTORS
        启用对指定选择器的调试。 对于选择器,可以指定逗号分隔的组件列表,也可以使用-d“*”为所有组件启用调试。 例如,-d “publish”显示所有“publish”相关的消息。
-e, --e
        记录到stderr并禁用syslog /文件输出。
-v, --v
        记录INFO级别的消息。

1.测试filebeat启动后,查看相关输出信息:
./filebeat -e -c filebeat.yml -d "publish"

2.后台方式启动filebeat:
nohup ./filebeat -e -c filebeat.yml >/dev/null 2>&1 &
    将所有标准输出及标准错误输出到/dev/null空设备,即没有任何输出
nohup ./filebeat -e -c filebeat.yml > filebeat.log &